
Monday, May 16, 2011
Delicated Striated Bleh
The aforementioned pot melt of yuck didn't come out as bad as it looked upon first peek into the kiln, but it's definitely quelled my desire to run out and do another.

Saturday, May 14, 2011
Things Accomplished in the Studio Today
1. Removed pegboard from behind large kiln, cut down to appropriate size for the wall behind my workbench, rendered bright green. (Also rendered nostril hairs bright green due to blowback from spray paint!)

2. Envisioned, sourced and constructed rack for heavy kiln shelves which allows me to set them down without mashing my fingers. Helpful note for those wanting to try this at home: Lowes has 12" pressed sheet metal brackets for around $2. Screw them into thick plywood, and affix the plywood securely to studs. I have a metal studs in the unfinished half of my basement where the monster kiln lives, so I bolted the plywood to the studs -- be sure to use a washer to spread out the pull load! If you're lucky enough to have wood studs in your studio, just screw the plywood directly into them.

3. Found creepy crawly individual drowned in the basin under the saw.

4. Wasted two pounds of glass making a very brown pot melt. Something reacted with something else, and instead of a sprightly green and blue melt with a few dashes of yellow, I got delicately striated poo (not pictured -- the wounds are still too fresh).
[Update: It wasn't as bad as it looked when I cheated and peeked at 300°.]
Friday, May 13, 2011
Clicking Away
I get a feeling of satisfaction when all three of my kilns are working away, happily clicking their relays on and off.
The toaster (my small tabletop kiln) is making custom streamer glass. Bullseye manufactures clear sheet glass with colored streamers of glass rolled into it in a small palette colors: black, green, white, blue. Definitely not chocolate brown, which is a necessary component of the cufflinks a client has requested for his wedding party. No problem! I can melt stringer into sheet glass, too! To get the lovely ribbony effect of the manufactured streamer glass, I'm trying a couple of methods of using clear coarse frit to distort the straightness of the brown stringer.


The medium kiln is cooking up a sample tile of new glass rods. Rods are traditionally used for making beads at a torch, but jealous kiln workers like myself are now using them in platters, pendants and all manner of unintended whatnot. The usual use for rods in fused glass is to snip bits of them off and use them cross-sectionally. They spread out into lovely circles. As you can see from the photos below, it can be difficult to predict what the cross-section of a rod will look like from observing the outside -- hence the samples!
The sample tile is pictured sitting on a stainless steel casting square that will figure into the next item ...


The big kiln is up to the most exciting project -- my first pot melt! Back when the medium kiln was my largest kiln, I made a few wire melts, but I was never particularly happy with them (especially the fact that the wire was inclined to sag down and attack the melted glass). Now I have a kiln with plenty of vertical room for raising the pot above the shelf, and plenty of horizontal room for kiln furniture!


And what am I doing after all of that? Taking a nap? Heck no -- I'm etching a commemorative recycled wine bottle serving tray.

I'm sure you're quite impressed by my fancy etching cream squeegee (aka, plastic fork)!
The toaster (my small tabletop kiln) is making custom streamer glass. Bullseye manufactures clear sheet glass with colored streamers of glass rolled into it in a small palette colors: black, green, white, blue. Definitely not chocolate brown, which is a necessary component of the cufflinks a client has requested for his wedding party. No problem! I can melt stringer into sheet glass, too! To get the lovely ribbony effect of the manufactured streamer glass, I'm trying a couple of methods of using clear coarse frit to distort the straightness of the brown stringer.


The medium kiln is cooking up a sample tile of new glass rods. Rods are traditionally used for making beads at a torch, but jealous kiln workers like myself are now using them in platters, pendants and all manner of unintended whatnot. The usual use for rods in fused glass is to snip bits of them off and use them cross-sectionally. They spread out into lovely circles. As you can see from the photos below, it can be difficult to predict what the cross-section of a rod will look like from observing the outside -- hence the samples!
The sample tile is pictured sitting on a stainless steel casting square that will figure into the next item ...


The big kiln is up to the most exciting project -- my first pot melt! Back when the medium kiln was my largest kiln, I made a few wire melts, but I was never particularly happy with them (especially the fact that the wire was inclined to sag down and attack the melted glass). Now I have a kiln with plenty of vertical room for raising the pot above the shelf, and plenty of horizontal room for kiln furniture!
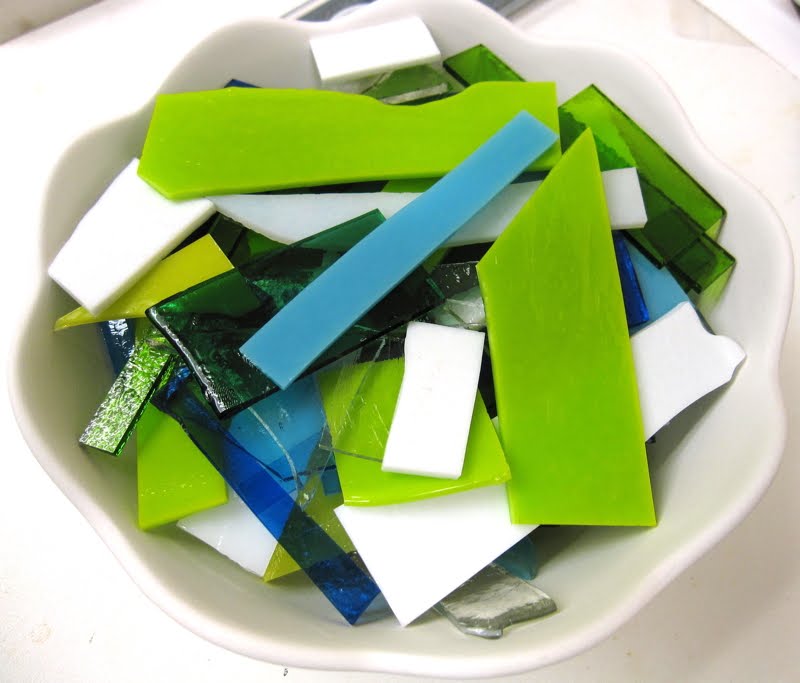
A springy mix of solid and transparent greens, blues, a few yellow bits, and a generous helping of white and clear glass.

One of the first things I bought for the new kiln was a ceramic bridge to hold pots hiiiigh above the kiln shelf.
And what am I doing after all of that? Taking a nap? Heck no -- I'm etching a commemorative recycled wine bottle serving tray.

I'm sure you're quite impressed by my fancy etching cream squeegee (aka, plastic fork)!
Wednesday, December 30, 2009
Becoming Saffron
Here's what I'm doing with my birthday -- becoming yellow! Next up -- off to Ikea for a temporary pantry. This is the way most people prepare for a dinner party, right? Shove all the furniture around, cover the floor in plastic, and produce piles of sawdust?
Around the corner, there's a glimpse of my in-progress dining room mural! Click the photo to see the full-size version.

Around the corner, there's a glimpse of my in-progress dining room mural! Click the photo to see the full-size version.

Thursday, December 3, 2009
Happily Drowning in Rings
Six pounds of metal in the form of hundreds of small rings just arrived from Canada. If I didn't still have to price everything for this weekend's show, I'd be parked on the couch with two pairs of pliers, humming. In addition to stocking up on my favorite shiny copper, I ordered some solid bronze, and some black and bronze anodized aluminum rings to experiment -- they're sooo pretty! When this show is over, I will be listing a bunch of new chainmaille bracelets, necklaces and watches -- I've been wearing the prototype watch every day for a couple weeks, and I LOVE it! I'll also be building a chainmaille necklace and bracelet configurator to allow customers to easily order maille pieces in custom lengths.
Tuesday, December 1, 2009
New option for pendant chains
Starting today, you can pick a new kind of handwoven chain to go with your fused glass pendant! I'm now offering a chainmaille weave that I just learned recently and has already become my favorite. It's a silly-sounding weave called Shaggy Loops, and I love the way it casually splays out when it lays against a surface like your neck or wrist. I'll soon be listing some bracelets and standalone necklaces made with this technique, too.

Monday, November 30, 2009
Back into the fire!
Saturday's glittering creations are out of the kiln and ready for shaping into pendants and cufflinks. Next, I'll trace outlines onto the ones that will be become circular with a Sharpie and cover the lines with Chapstick so that they don't wash off while I'm grinding -- very high tech! Then I'm off to the basement for a while to shape each piece individually in two stages on the lap wheel -- first with a pad covered in 120 grit diamond pieces, then I'll move up to a 400 grit pad for a second pass. The spinning pads have to be kept cool with a constant stream of water, so this is a rather wet and messy experience. Hence the Chapstick!


Subscribe to:
Posts (Atom)


